

How to Make a Builder-Grade Range Hood Look Custom Without Replacing It
If your range hood looks like a stainless box bolted under your cabinets, you are not alone. Roughly every kitchen built in the last fifteen years has the same off-the-shelf hood, and it is single-handedly responsible for keeping your kitchen looking generic no matter how nice your countertops are. The good news: you do not have to rip it out and spend $1,200 on a custom plaster hood to fix the problem. You can make the existing one look intentional with under $100 of materials and a Saturday afternoon.
The trick is treating the hood like a piece of architecture instead of an appliance. Once it visually disappears into the cabinetry or reads as a designed feature, the entire kitchen levels up. Here are the five fixes that work, organized by the specific eyesore each one solves.
The Box Looks Cheap and Shiny
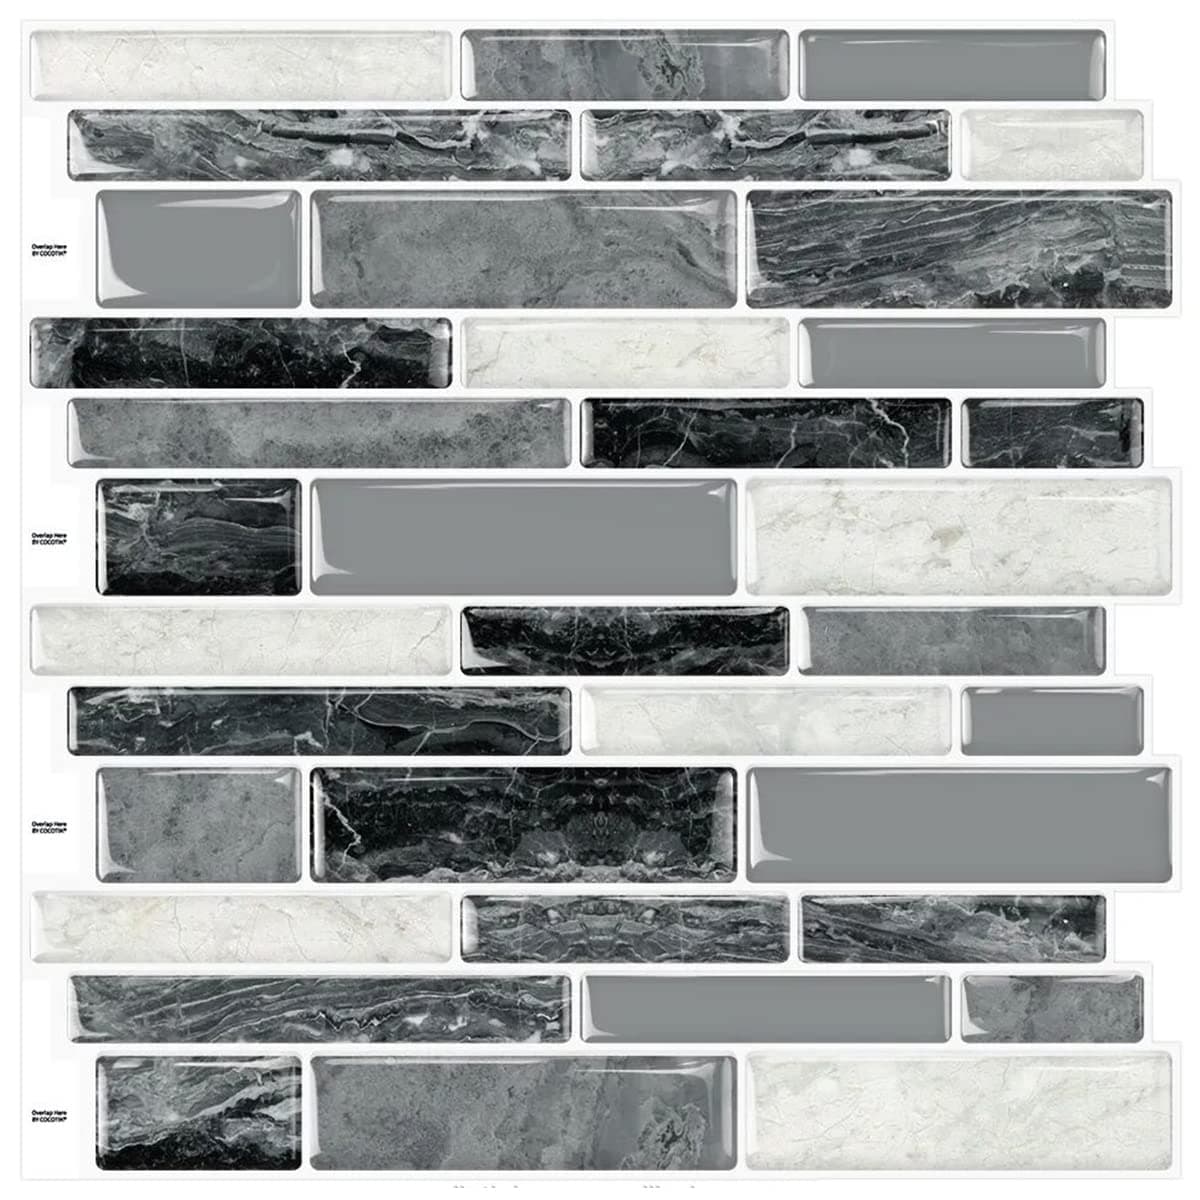
The single biggest tell of a builder hood is that flat stainless or chrome face. It catches light wrong, shows fingerprints, and screams "rental finish." Wrapping the visible front with peel-and-stick wood paneling instantly turns it into a focal point that reads as custom millwork.
Peel and Stick Wood Plank Paneling
$42
Self-adhesive wood plank wall paneling. Each pack covers 16 square feet. Real wood veneer over a peel-and-stick backing. Available in light oak, walnut, white-washed, and reclaimed barnwood finishes. Trim with a utility knife.
Measure the visible flat panel of your hood, cut the planks to fit, and stick them on. Use a heat gun if you want to soften the adhesive for repositioning. The whole job takes maybe an hour and you can pull it off later without damaging the hood, which matters if you are in a rental or might sell the place. The light oak finish reads as Scandinavian modern. The reclaimed barnwood reads as farmhouse. You pick the look.
The Edges Are Sharp and Unfinished
Even after you wrap the front, the bare edges of the hood still give it away. A simple stick-on trim or molding kit hides the seam between hood and ceiling and gives you the appearance of a built-in surround. This is the move that fools people the most.
Self-Adhesive Decorative Trim Molding Kit
$28
Flexible self-adhesive trim molding for kitchen cabinets, range hoods, and ceilings. 16 feet total length. Paintable polyurethane that mimics traditional wood molding. Cuts with scissors. White, primed and ready to paint.
Run a bead of trim where the hood meets the wall and where it meets the cabinets. Paint it to match either the hood or the cabinets, and the visual line that gives away the cheap-hood look just disappears. Most people do not notice trim consciously. They only notice when it is missing, which is exactly why builder kitchens feel slightly off.
The Color Is Chrome When You Wanted Matte Black
If you do not want to clad the hood in wood, you can paint the metal directly. The catch is that you need a high-temperature paint rated for appliances, because regular spray paint will yellow, peel, and stink the first time you use the stove. The good news is that high-temp appliance paint goes on easily and looks like a factory finish when cured.
High-Heat Appliance Paint Kit
$22
High-heat resistant spray paint rated to 500 degrees F. 12 ounce can. Specifically formulated for appliances, range hoods, grills, and stoves. Available in matte black, satin black, charcoal, and stainless. Includes prep wipes.
Tape off everything you do not want painted. Wipe the hood down with the prep wipes. Apply two thin coats with about 15 minutes between them. Let it cure for 24 hours before turning the hood back on. Matte black is the most popular choice right now and it makes any stainless box look like a designer piece. One can does a single hood with paint left over for touch-ups.
The Backsplash Stops Two Inches Below the Hood
This one is sneaky. A lot of builder kitchens stop the backsplash tile right at the bottom of the upper cabinets, which leaves an awkward strip of painted drywall between the cabinet line and the underside of the hood. Even after you fix the hood itself, that bare wall makes the whole arrangement look unfinished. Peel-and-stick backsplash tile patches it in an afternoon.
Peel and Stick Backsplash Marble Tile
$32
10-pack of self-adhesive backsplash tiles in marble herringbone pattern. Each tile is 12 x 12 inches. Heat and water resistant. Cuts with scissors to fit around outlets and edges. Easy to remove without damaging the wall.
Run the new tile up to the bottom of the hood so the backsplash actually meets it. The visual continuity is what sells the look. Once the tile carries up behind the hood, the hood reads like part of an integrated wall composition instead of a floating box.
The Sides Are Still Bare Stainless
Even after the front is wrapped or painted, the visible sides of the hood often stay shiny stainless. A wide roll of marble or wood-grain contact paper handles this for under $20 and ties everything together. Use the same finish you applied to the front, or pick a contrasting marble pattern that matches your countertops if you went the painted route.
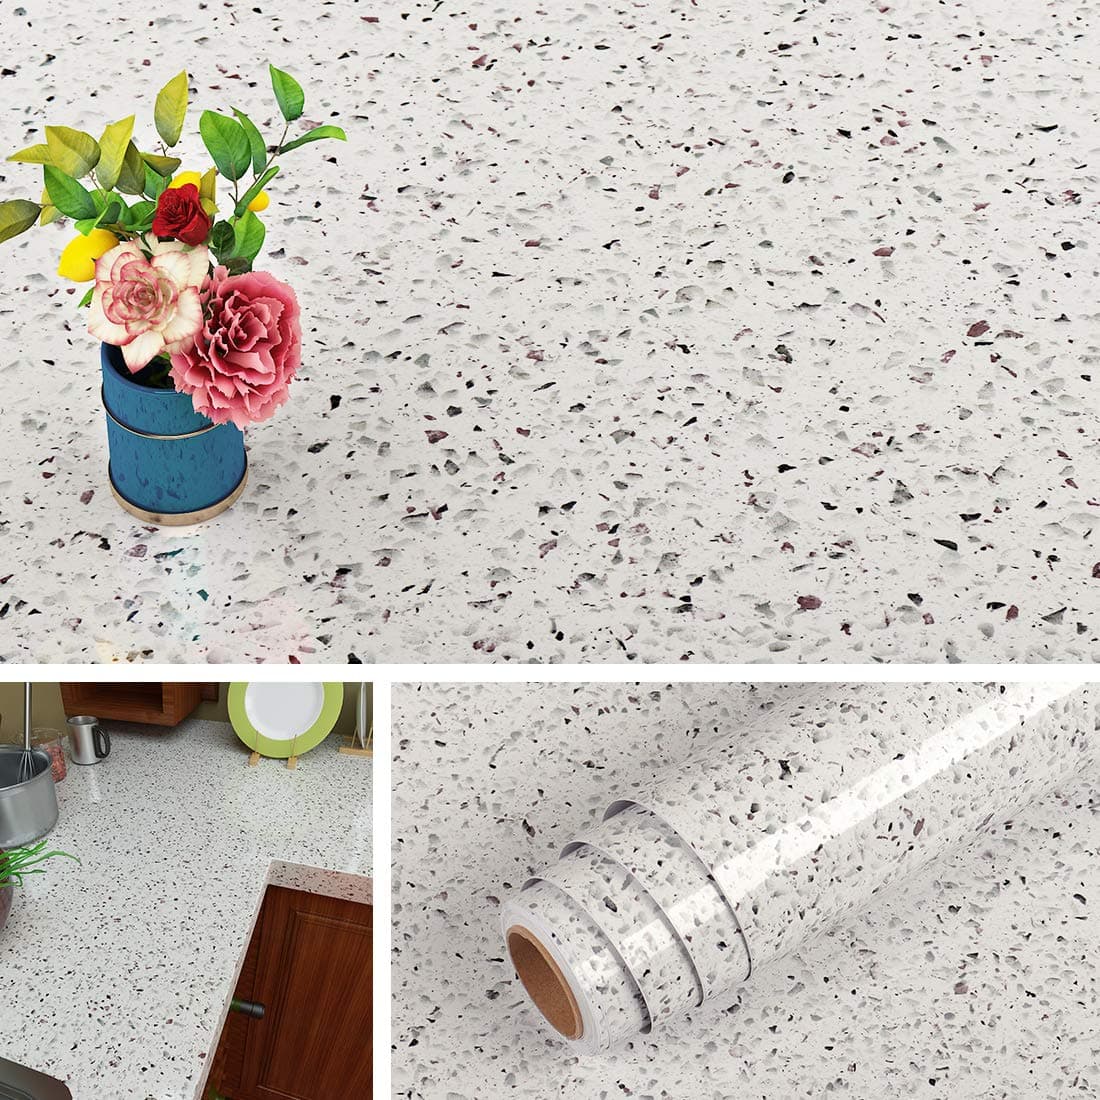
Marble Contact Paper Wrap
$18
Self-adhesive marble pattern contact paper. 17.7 inches wide by 78.7 inches long. Heat-resistant up to 250 degrees F. Removable without leaving residue. Available in white Carrara, gray, black marble, and warm beige patterns.
Wipe the hood sides down with rubbing alcohol so the contact paper sticks well. Apply slowly with a credit card to push out air bubbles. Trim the edges with a sharp utility knife. The whole job takes maybe twenty minutes per side and the result looks like you spent real money on a custom finish.
What to Skip
Skip cheap stick-on plastic "hood covers" that sit awkwardly off the surface. They never lay flush, they catch grease in the seams, and they look exactly as fake as they are. Also skip painting the hood with regular interior wall paint, no matter what a Pinterest post tells you. It will yellow within weeks and start flaking the first time you actually cook something. Either use the high-temp appliance paint or wrap the hood with adhesive material. Those are the only two finishes that hold up.
The whole project, even if you do all five fixes, comes in under $150 and a weekend of work. Your hood will look custom enough that anyone walking into your kitchen will assume you renovated. They do not need to know it is still the same builder box underneath.
Found something you love? Pin this for later so you don't lose it!
Affiliate Disclosure
This post contains affiliate links. Haven & Home may earn a commission on purchases made through these links, at no extra cost to you. We only recommend products we genuinely love.
You Might Also Love
 Kitchen
Why Linen Roman Shades Are Taking Over Kitchen Windows This Spring
Scroll any kitchen reno hashtag right now and you'll see linen roman shades replacing every plastic blind in sight. Here's why and what to buy.
 Kitchen
Why Copper Kitchen Accents Are Taking Over Countertops
Copper kitchen accents are everywhere right now — and for good reason. Here's how to style them across your countertop, sink, stovetop, and open shelves.
 Kitchen
8 Spring Baking Tools Under $30 That Make You Feel Like a Real Baker
Most amateur bakers are one or two tools away from results that look and taste professional. Here are 8 spring baking upgrades all under $30.